Review Article
Orthoplastic Techniques in Lower Extremity Reconstruction
Edgardo Rodriguez-Collazo1*, Adam Finzen2, Tom Campbell2, Luis Sanchez2 and Michael
Regan2
1Department of Surgery, Chicago Foot and Ankle Deformity Correction Center, Presence Saint Joseph Hospital,
Chicago, Illinois, USA
2Department of Surgery, Section of Podiatric Surgery, Presence Saint Joseph Hospital, Chicago, Illinois, USA
*Corresponding author: Edgardo Rodriguez-Collazo, Department of Surgery, Chicago Foot and Ankle Deformity Correction Center, Presence Saint Joseph Hospital, Chicago, Illinois 60657, USA
Published: 21 Sep, 2017
Cite this article as: Rodriguez-Collazo E, Finzen A,
Campbell T, Sanchez L, Regan M.
Orthoplastic Techniques in Lower
Extremity Reconstruction. Clin Surg.
2017; 2: 1632.
Abstract
Lower extremity limb salvage is a costly and difficult aspect of health care. Inadequate preparation, planning, and execution can lead to unsatisfactory results. In an effort to advance the surgical skills for lower extremity surgeons, this paper offers several different procedures focusing on the orthoplastic aspect of limb salvage. The medial hemi-soleus, the lateral hemi-soleus, and peroneus brevis muscle flaps can be excellent tools in the arsenal of a surgeon attempting to preserve a patient’s limb. These procedures, among many others in the lower extremity, create large wounds that are in need of closure and are described in detail. Therefore, the authors also provide a novel method for wound closure consisting of skin staples and vessel loops which can be used in a multitude of surgical and clinical scenarios, supported by several case presentations.
Introduction
Limb salvage procedures in the lower extremity involve complex preoperative, perioperative, and postoperative management. Such procedures create large wounds that are difficult to close and can create debilitating sequelae for the patient [1]. Muscle flaps can be utilized for many lower extremity limb salvage procedures including chronic ulcerations, trauma, and soft tissue defects. This paper presents a technique guide for three types of reverse muscle flaps that can be utilized to treat such conditions and prevent amputation [1,2]. It also presents a novel technique for delayed closure of large wounds of any etiology.
Muscle Flap Technique Guides
Peroneus brevis (Appendix 1)
The patient is induced under general anesthesia and is placed on the surgical table in a lateral or
‘jack knife’ position. The knee is partially flexed and lateral malleolus is superior. A thigh tourniquet
is placed on the same extremity. The lower extremity is prepped and draped in the usual aseptic
manner. A surgical skin ink marker is used to draw the incision on the lateral aspect of the leg.
The line should be drawn starting 10cm proximal to the tip of the lateral malleolus and extending
proximal along the long axis of the bone to cover 2/3 of the fibula. The incision is made with a #10
blade and handle in a full thickness, cutaneous-adipose-fascial fashion. Small bleeders are clamped
and electrocauterized as necessary. Medium caliber vessels are clamped and tied with 3-0 vicryl
suture. It is important to preserve the soft tissues surrounding the three peroneal artery perforators
that are located on the lateral leg compartment at the distal third of the leg. These arterial perforators
are located at 5 cm, 10 cm and 15 cm proximal to the lateral malleolus [2]. This is the reason the
incision ends distally at 10 cm proximal to the lateral malleolus.
Dissection through the peroneal fascia is completed at this time with care being taken to
separate the fascia from the underlying muscle bellies prior to transection. The peroneus longus
tendon and muscle can be visualized at this time. Anatomically, the peroneus brevis muscle is deep
to the peroneus longus. Between the muscle bellies lies a thin fascia which is dissected under loop
magnification to avoid injury of the superficial peroneal nerve which travels deep to the longus
muscle and superficial to the brevis muscle. This nerve leaves the lateral compartment between the
peroneal tendons and at the inferior 1/3 of the leg it perforates the superficial crural fascia to travel
deep to the skin and to the anterior leg compartment, just lateral to the tibialis anterior tendon.
Care should be taken to avoid traumatic injury to this nerve by atraumatic retraction techniques.
Proper identification of the peroneus brevis tendon and muscle belly can be performed at this time. A hand held intraoperative arterial Doppler is used to first identify the peroneus brevis muscle distal segmental arteries. There must be at
least two segmental arteries providing blood flow to the muscle belly
at the distal end for adequate perfusion of the flap. After identification
of the arteries, the muscle is dissected and removed from its origins
on the fibula. Hydrogen peroxide should be used to flush the surgical
site and muscle for assistance with hemostasis [3]. Once the muscle
is freed, it can be carefully transferred to the soft tissue defect or open
wound. The range of this flap can include the anterior inferior 1/3 of
the tibia, the anterior ankle joint, or the lateral malleolus. To reach
these areas, an incision must be created connecting the wound to
the peroneal incision site. This new incision is only through the skin
and superficial fascial layers. The flap site is prepared by careful sharp
debridement. The lightly bleeding belly of the peroneus brevis muscle
is applied to the wound defect, and four simple interrupted sutures
are applied to the muscle/skin conjoined areas at 2, 5, 8 and 11 o’clock
sites. A large drain can be applied at the fascial level and the drain
exits the incision site at a separate skin small incision created at the
anterior or posterior leg compartment of the leg. The skin incisions
between the wound site and the large peroneal incision site is partially
closed with subdermal 3-0 vicryl suture, and closed on the skin with
skin staples. The original large peroneal incision is closed in layers by
closing the fascial layer with 3-0 vicryl suture material, then closing
the subdermal layer with 3-0 vicryl suture material. Final skin closure
is performed with skin staples and the surgeon prefers to utilize the
vessel loop closure described later in the paper to assist with decrease
of incision site tension.
Lateral soleus muscle (Appendix 2)
The patient is positioned and the incision is drawn and created
in the same fashion as the previous procedure. Again, care should
be taken to preserve the three constant perforators at this area. The
incision is carried through the deep fascia following the posterior
aspect of the peroneus longus muscle belly. The lateral soleus
muscle belly and fascia can be identified and is separated from the
peroneus longus muscle. The dissection is continued along the dorsal
and posterior aspect of the lateral soleus muscle belly, separating
it from the fascia of the lateral head of the gastrocnemius muscle.
Care is taken to preserve arterial and venous irrigation to the central
and medial portion of the soleus muscle. The soleus muscle is then
dissected from its attachment to the tibia and dissected distally to
the distal third of the leg. Care is taken to mark on the skin, with a
pen marker, the areas of the peroneal perforator arteries supplying
this muscle at its distal third of the leg. These perforators are found
with the use of a hand held arterial intraoperative Doppler. After
the lateral half of the soleus muscle is reflected distally, an incision
is made from its distal attachment to the wound defect area on the
distal tibia, anterior ankle, or the lateral malleoli wound or defect
area. The incision is deepened to the fascia, preserving any nerves
and major arterial/venous tributaries. The harvested muscle belly is
laid down through this incision and covers the wound defect. It is
sutured at 4 sites surrounding the wound in the same manner as the
previous procedure. The skin incision sites are closed at fascial and
subdermal level with 3-0 vicryl suture material. A JP suction drain is
placed deep to this area. The skin is closed with skin staples, and again
the preference of the surgeon is to provide the vessel loop closure
described later in this paper.
Medial soleus muscle (Appendix 3)
The patient may be positioned supine with external rotation of
the leg. The leg is prepped and draped in the usual aseptic manner.
A skin marker is utilized to draw the planned incision, starting
at approximately 15 cm proximal to the medial malleolus and
continues proximal approximately 4 cm posterior to the palpable
posterior aspect of the tibia, and extending proximally to about 2/3
of the length of the leg. Again, follow the 5 cm, 10 cm, 15 cm rule
for identifying the leg perforators [2]. This reasoning is crucial for
determining that the distal muscle dissection and deep incision ends
right around 15 cm proximal to the ankle medial malleolus. Again,
these 3 segmental arteries are identifying with an intraoperative arterial Doppler, with the patient on the operative table and before
any incision are performing on the leg. Once identified, the incision
is a single, cutaneous-adipose-fascial incision. The superficial fascia
of the lateral head of the gastrocnemius muscle belly is identified, and
a linear incision is done between the gastrocnemius lateral border
and the underlying medial aspect of the soleus muscle. Separation of
the soleus is performed, leaving the fascia of the muscle attached to
the underlying gastrocnemius fascia. The lateral and deep dissection
of the soleus is performed, with care taken to preserve the fascia of
the muscle attached to its surrounding tissue. The entire lateralcentral
soleus muscle is dissected, preserving the surrounding fascial
septums, including the septum dividing the posterior from lateral
compartment. The deep posterior septum where is where the tibial
artery, nerve and vein is located. After harvesting the soleus medial
muscle belly, an incision as carried from the distal incision site to the
wound defect area. The defect can be reached on the tibia, ankle, or
calcaneus. Prepare the recipient site by sharply debriding the wound
area. The medial bleeding muscle belly is then applied along the deep
part of this new incision and filling the wound or defect. It is secured
to its transfer wound defect area with 4 sutures on the skin in the same
manner mentioned previously. The fascia is closed with absorbable
3-0 vicryl suture material and the skin is closed with a vacuum drain.
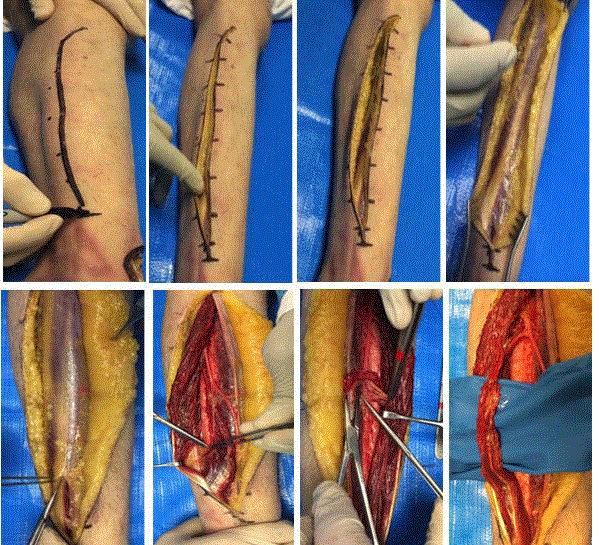
Appendix 1
Appendix 1
Line is drawn from 5 cm proximal to malleolus proximally
2. Incision is created through adipose layer
3. The superficial fascia is transected
4. The muscular fascia is exposed
5. The muscular fascia is transected
6. Separation from the fascia of the longus and brevis
7. Identify any perforators and vital structures
8. Separation of brevis from fibula for free flap
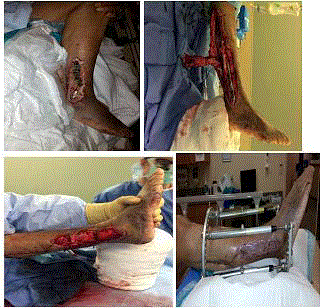
Appendix 2
Appendix 2
(From top left)
1. Chronic, open wound with lateral ankle plate exposure
2. Dissection of free flap of lateral soleus
3. Application of graft overlying lateral ankle
4. External fixator construction and progressed healing
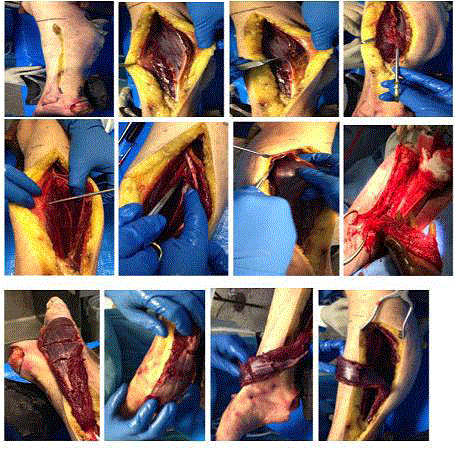
Appendix 3
Appendix 3
(From top left)
1. Incision is drawn and created 5 centimeters proximal to ankle joint and
continuing proximally
2. The superficial fascia is transected to expose the muscle
3. The medial soleus is separated from the gastrocnemius
4. Dissection of medial soleus from superficial compartment
5. Dissection of medial soleus from deep compartment
6. Further deep compartment dissection
7. Mobile soleus muscle
8. Resection of soleus muscle from origin on tibia, leaving proximal
perforators intact
9. Application of muscle to lateral heel
10. Application of muscle to posterior heel
11. Application of muscle to ankle joint and medial malleolus
12. Application of muscle to anterior tibia
Figure 1
Figure 2
Figure 3
Surgical Considerations and Pearls
External fixation
Any motion to the lower extremity will decrease success of the
muscle flap due to the interruption of the microvasculature. This
may lead to graft necrosis and subsequent failure. External fixation
is for skeletal stabilization and requires the patient to be non-weight
bearing for 4-6 weeks or until complete incorporation of the flap.
Once this occurs, to construct, two olive wires are placed into the
calcaneus, and two smooth wires or half pins are placed into the tibia.
This allows for adequate exposure of the graft and incision sites for
wound vacuum changes every five to seven days. Avoidance of the
muscle flap site is crucial for placement of wires and pins.
Postoperative protocols
Initial dressings are changed at the seven day post-operative
visit. This allows the graft ample time incorporate beneath the
wound vacuum. At this point, the vacuum is changed every five to
seven days with the settings remaining at 125 mmHg of continuous
negative pressure. If there are any large drains, they are typically
pulled 24-28 hours post operatively once it is determined that less
than 10 milliliters is collected from said drain. This decreases the risk
of hematoma formation or compartment syndrome. Incision site
staples are removed at the surgeon’s discretion, and close monitor
of the patient is required. At the third postoperative visit, muscle
and skin graft viability are able to be determined. Secondary skin
grafting could be scheduled at this time. At the four to six week mark
the external fixation device is removed and the patient is placed in a
CAM boot with slow transition into weight bearing status based on
surgeon preference.
Vessel loop “shoelace” closure
Traditional primary closure of large wounds can be exceedingly
difficult. Post-operative edema can lead to dehiscence, infection, and
possibly amputation. To reduce this risk, the vessel loop “shoelace”
technique is provided for the delayed closure of large wounds. This
technique uses dermatotraction via silastic vessel loops and with
staple fixation to provide gradual primary closure through the
viscoelastic properties of the skin with little need for grafting [4-6].
This procedure is demonstrated through the presented case studies
involving large incision surgeries such as fasciotomies or abscess
drainage. The presented patients had the closure technique applied
and were tensioned as needed until sufficient closure was obtained.
This closure provided a simple, cost-effective method for dynamic reapproximation
of the skin margins.
Surgical technique
An incision is re-approximated via the deep structures, and two
staples are placed at the apex of the incision and a vessel loop is passed
through. The surgeon has found that the larger the vessel loop, the
easier it is to provide traction. If a larger vessel loop is unavailable,
the surgeon typically “doubles” the vessel loop either by folding in
half or running a second vessel loop alongside the first. While under
mild tension, staples and vessel loops are placed along the incision in
a crisscross manner, approximately one centimeter from the wound
margins and one centimeter between staples. While the 1 centimeter
suggestion is routinely utilized, poor skin quality may impair the
area. Utilize healthy, viable skin only for this type of closure. Upon
reaching the opposite end of the wound, two staples are placed at the
end, and the vessel loops are tied off. If the vessel loops do not reach
the end of the incision, they may be tied off and stapled to the skin
as distance allows. A non-adherent dressing is applied between the
skin and vessel loops as to relieve pressure should edema occur or
the patient’s skin reacts to the vessel loops. Postoperative care for the
wound sites provides convenience for the clinician and patient. Retensioning
can be performed in the office as needed, should slacking
be discovered upon change of dressing. With heavy granulation tissue formation, some surgeons perform silver nitrate applications
to reduce such issues and assist with resolution of the open wounds
more quickly.
Cases
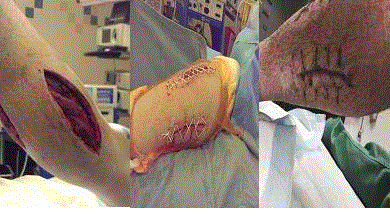
1. 19 year old male with history of 3 year old gunshot wound
to the left calf, developed an abscess with cellulitis and subsequent
compartment syndrome. Patient underwent an incision and drainage
with four compartment fasciotomy. Following serial debridements,
a shoelace closure was applied. The patient was seen in clinic three
times a week for local wound care and to re-tension the vessel loops
as needed. Patient was considered closed after six weeks of treatment
Figure 1.
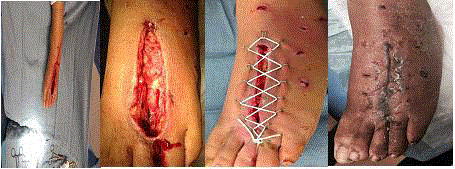
2. 11 year old female presented with purulent drainage
following laceration to third interdigital web space of left foot. After
imaging discovered abscess to foot, patient underwent emergent
incision and drainage. Incision spanned the entire dorsum of foot.
Following serial debridements, a shoelace closure was applied. The
patient was seen in clinic three times a week for local wound care
and to re-tension the vessel loops as needed. Patient was considered
closed after 4 weeks of treatment Figure 2.
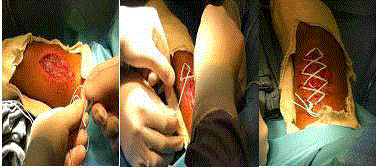
3. 28 year old man with history of transmetatarsal amputation
developed a wound to the ipsilateral leg secondary to improper use
of CAM boot. After undergoing several weeks of local wound care,
purulent drainage and malodor was noted to wound. Incision and
drainage was performed in the operating room and the shoelace
closure was applied. Healing was noted at 6 weeks post debridement
Figure 3.
Discussion
Large wounds have many etiologies. They all share the difficulty in closure using traditional techniques. Muscle flap techniques are an excellent way to provide wound closure and filling of deficits. The aforementioned methods can provide a unique limb salvage procedure to many areas of the lower extremity. With such flaps, wound healing can be accomplished and many limbs can be saved, decreasing mortality for those affected. With larger incisions, wound dermatotraction, which uses silastic vessel loops and staple eyelets to address these difficulties by providing gradual primary closure through constant tension of the wound margins. Studies have shown that when a constant force is applied to skin, such as dermatotraction, mechanical creep occurs by realigning collagen fibers and fragmenting the elastic fibers, allowing the skin to stretch beyond the normal limits promoting closure without the need for grafting [6,7]. The wounds presented here closed via granulation over four to six weeks. Other studies have used primary closure after using this technique for 7-21 days. The discrepancy between times of closure is related to how frequently the closure was re-tensioned [5,8-11]. While encouraged, 100% closure of the wounds is not the primary goal of the technique, rather acceleration of closure itself. This technique can be utilized in conjunction with staging for primary closure should reapproximation prove difficult. This technique has several benefits. It provides constant pressure on the wound margins while allowing for stretch should swelling occur. The closure can be paired with other wound care modalities such as hydrotherapy and negative pressure wound therapy. It avoids the complications of using skin grafts. It is relatively inexpensive and requires little preparation as the materials are often readily available in most operating rooms. There are noted disadvantages to the shoelace technique. Tension is not uniform across the incision. With no way of monitoring tension in the vessel loops, it relies on the surgeon to determine how much tension is appropriate for the site. Periods between re-tensioning varies from daily to as needed, depending on the surgeon’s preference. Local ischemia can occur with too much tension and the vessel loops should be removed or re-tensioned if there is discoloration/blanching to the wound margins. This technique should be avoided in ischemic limbs as application may cause further insult to the skin, decreasing healing potential [12].
References
- Carinci F, Massi Benedetti M, Klazinga NS, Uccioli L. Lower extremity amputation rates in people with diabetes as an indicator of health systems performance. A critical appraisal of the data collection 2000-2011 by the Organization for Economic Cooperation and Development (OECD). Acta Diabetol. 2016;53(5):825-32.
- Mathes SJ, McCraw JB, Vasconez LO. Vasconez, Muscle Transposition Flaps for Coverage of Lower Extremity Defects: Anatomic Considerations. Surg Clin North Am. 1974;54(6):1337-54.
- Rodriguez-Collazo E, Riddle D, Schmidtke K. Indications and Use of Hydrogen Peroxide during Microvascular Flap Reconstruction Surgery: A Literature and Procedural Use Review. J Reconstr Microsurg Open. 2017;2(1):e23-5.
- Harrah J, Gates R, Carl J, Harrah JD. A simpler, less expensive technique for delayed primary closure of fasciotomies. Am J Surg. 2000;180(1):55-7.
- Asgari MM, Spinelli HM. The vessel loop shoelace technique for closure of fasciotomy wounds. Ann Plast Surg. 2000;44(2):225-9.
- Wilhelmi BJ, Blackwell SJ, Mancoll JS, Phillips LG. Creep vs. stretch: a review of the viscoelastic properties of skin. Ann Plast Surg. 1998;41(2):215-9.
- Eid A, Elsoufy M. Shoelace wound closure for the management of fracture-related fasciotomy wounds. ISRN Orthop. 2012;2012:528382.
- Zorrilla P, Marín A, Gómez LA, Salido JA. Shoelace technique for gradual closure of fasciotomy wounds. J Trauma. 2005;59(6):1515-7.
- Murakami M, Morikage N, Samura M, Yamashita O, Suehiro K, Hamano K. Shoelace technique plus vacuum-assisted closure in leg fasciotomy. ANZ J Surg. 2014;84(10):795.
- Wiger P, Blomqvist G, Styf J. Wound closure by dermatotraction after fasciotomy for acute compartment syndrome. Scand J Plast Reconstr Surg Hand Surg. 2000;34(4):315-20.
- Berman SS, Schilling JD, McIntyre KE, Hunter GC, Bernhard VM. Shoelace technique for delayed primary closure of fasciotomies. Am J Surg. 1994;167(4):435-6.
- Rodriguez-Collazo E, Rathbone C, Barnes B. A Retrospective Look at Integrating a Novel Regenerative Medicine Approach in Plastic Limb Reconstruction. Plast Reconstr Surg Glob Open. 2017;5;e1214.

